Bootstrap Progress bar Panel
Intro
We realize really well this empty straight component being definitely featured empty at first and getting packed with a dynamic color tone bit by bit while an procedure, a download of a data or else commonly any type of activity is being finished bit by bit-- we find it daily on our computers therefore the notification it sends came to be pretty instinctive to acquire-- something gets done and now it's finished at this quantity of percent or if you prefer looking at the empty side of the glass-- there is this much left before ending up . An additional bonus is that the notification it sends doesn't encounter any type of foreign language barrier since it clean visual and so when comes time for present the level of our various abilities, or the status or even different components of a project or generally whatever having a complete and not a lot parts it is definitely wonderful we are able to have this type of graphic feature installed right in our pages in a speedy and uncomplicated way.
What's updated?
Inside of the latest fourth edition of the absolute most preferred mobile friendly system this grows even quicker and less complicated along with simply just a single tag element and there are certainly plenty of modifications obtainable which in turn are accomplished with just appointing the suitable classes. What is definitely fresh here is since the Bootstrap 4 drops the IE9 support we can right now require whole advantage of the powers of HTML5 and instead of producing the outer so called empty container along with a <div> initially and wrapping within the true fill amount in yet another <div> element within it and designating its size to showcase the actual Bootstrap Progress bar Panel as it used to be using the prior edition currently we can absolutely simply employ the HTML5 <progress> element preparing the max value and the value so far accomplished as properties.
General functions
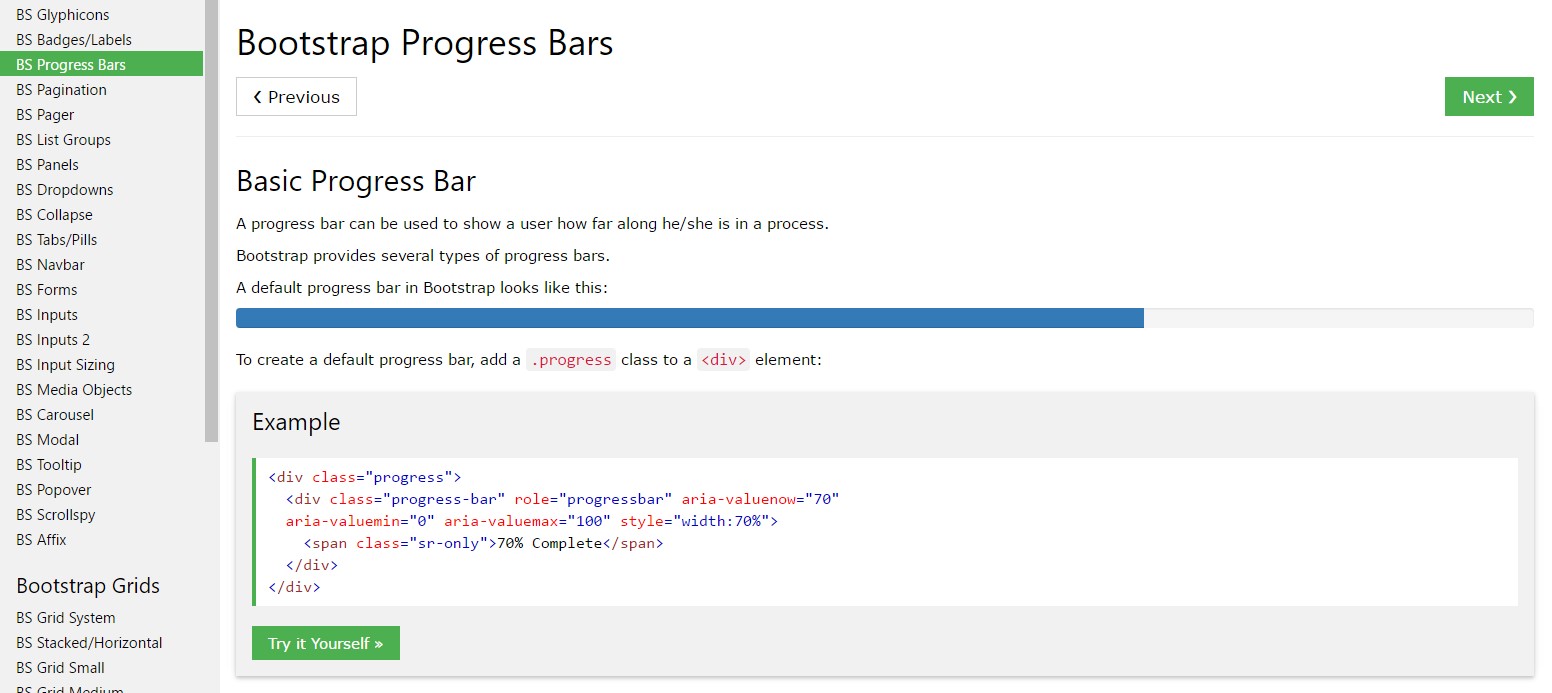
To start just produce a <progress> element with the class .progress assigned to it and include the value = " ~ the amount you have progressed so far ~ " and max = " ~ the overall amount ~ " attributes to it. There is generally a important part here-- these have the ability to be any amounts at all-- the logic is the max attribute value needs to always be bigger than the value in itself however, in case you play around and generate the maximum smaller sized than the progress value itself you'll just turn out to be with a filled progress bar much like the task's been absolutely executed. However you don't actually need to expect anything in order to get those values in percentage or anything-- in case for instance you have 2567 strawberries to eat and you have probably feasted upon 378 of them-- record it clearly { by doing this and the progress bar will certainly present appropriately spreading out the colored part as far as 378 correlates to 2567-- convenient and fast .
So right now since we realize precisely how it does the job why don't we observe how to help make it look far better delegating certain effects and colors . Firstly-- we can surely employ the contextual classes merged with the .progress- in a class-- such as .progress-warning , .progress-info and so forth specified to the <progress> component. We can in addition incorporate certain stripes to our progress bars by using the .progress-bar-striped class as well as certain animation to these stripes with the .progress-bar-animated applied.
And finally if you need to obtain older browser compatibility you can use two <div> elements – as in the older version outer one with just the .progress class and inner with all the appearance adjustment classes and an inline styling setting the filled in width like style = " width:23%; " - still works as well.
And as a final point supposing that you require to acquire older internet browser compatibility you can employ a couple of <div> components-- like in the older edition outer one with simply just the .progress class and inner with all of the appeal adjustment classes and an inline designing establishing the filled in width like style = " width:23%; " - continue to works too.
Tips and examples
How to work with the Bootstrap Progress bar Form:
Bootstrap Progress bar Jquery elements are constructed with two HTML components, some CSS to specify the size, and a several attributes.
We utilize the .progress as a wrapper to identify the optimum value of the progress bar.
We operate the inner .progress-bar to specify the progress so far.
The .progress-bar demands an inline look, utility class, or customized CSS to set their width.
The .progress-bar also demands some role and aria attributes to make it attainable.
Put that all together, and you have the following examples.
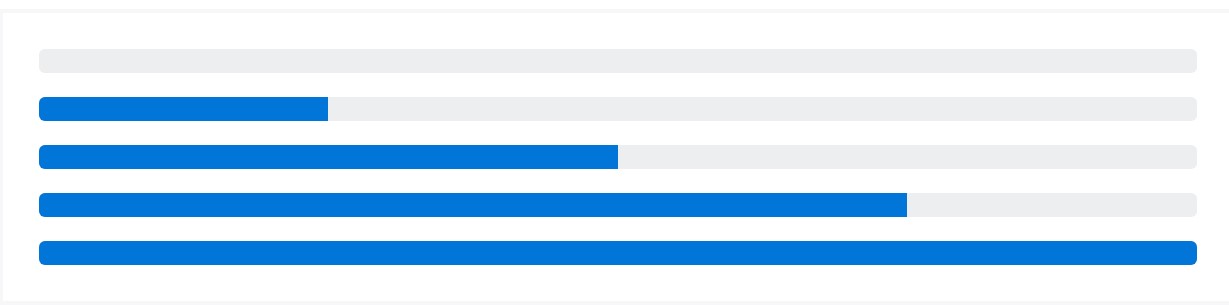
<div class="progress">
  <div class="progress-bar" role="progressbar" aria-valuenow="0" aria-valuemin="0" aria-valuemax="100"></div>
</div>
<div class="progress">
  <div class="progress-bar" role="progressbar" style="width: 25%" aria-valuenow="25" aria-valuemin="0" aria-valuemax="100"></div>
</div>
<div class="progress">
  <div class="progress-bar" role="progressbar" style="width: 50%" aria-valuenow="50" aria-valuemin="0" aria-valuemax="100"></div>
</div>
<div class="progress">
  <div class="progress-bar" role="progressbar" style="width: 75%" aria-valuenow="75" aria-valuemin="0" aria-valuemax="100"></div>
</div>
<div class="progress">
  <div class="progress-bar" role="progressbar" style="width: 100%" aria-valuenow="100" aria-valuemin="0" aria-valuemax="100"></div>
</div>
Bootstrap grants a number of utilities for specifying width. Depending on your demands, these may likely support with quickly building progress.

<div class="progress">
  <div class="progress-bar w-75" role="progressbar" aria-valuenow="75" aria-valuemin="0" aria-valuemax="100"></div>
</div>
Modifying
Custom the appeal of your progress bars with custom-made CSS, background utilities, stripes, and even more.
Labels
Bring in labels to your progress bars with positioning text within the .progress-bar.

<div class="progress">
  <div class="progress-bar" role="progressbar" style="width: 25%;" aria-valuenow="25" aria-valuemin="0" aria-valuemax="100">25%</div>
</div>
Height
We simply set a height value on the .progress-bar, therefore supposing that you alter that value the outside .progress is going to immediately resize correctly .

<div class="progress">
  <div class="progress-bar" role="progressbar" style="width: 25%; height: 1px;" aria-valuenow="25" aria-valuemin="0" aria-valuemax="100"></div>
</div>
<div class="progress">
  <div class="progress-bar" role="progressbar" style="width: 25%; height: 20px;" aria-valuenow="25" aria-valuemin="0" aria-valuemax="100"></div>
</div>
Backgrounds
Employ background utility classes to transform the visual appeal of individual progress bars.

<div class="progress">
  <div class="progress-bar bg-success" role="progressbar" style="width: 25%" aria-valuenow="25" aria-valuemin="0" aria-valuemax="100"></div>
</div>
<div class="progress">
  <div class="progress-bar bg-info" role="progressbar" style="width: 50%" aria-valuenow="50" aria-valuemin="0" aria-valuemax="100"></div>
</div>
<div class="progress">
  <div class="progress-bar bg-warning" role="progressbar" style="width: 75%" aria-valuenow="75" aria-valuemin="0" aria-valuemax="100"></div>
</div>
<div class="progress">
  <div class="progress-bar bg-danger" role="progressbar" style="width: 100%" aria-valuenow="100" aria-valuemin="0" aria-valuemax="100"></div>
</div>
Multiple bars
If you want, provide numerous progress bars inside a progress component .

<div class="progress">
  <div class="progress-bar" role="progressbar" style="width: 15%" aria-valuenow="15" aria-valuemin="0" aria-valuemax="100"></div>
  <div class="progress-bar bg-success" role="progressbar" style="width: 30%" aria-valuenow="30" aria-valuemin="0" aria-valuemax="100"></div>
  <div class="progress-bar bg-info" role="progressbar" style="width: 20%" aria-valuenow="20" aria-valuemin="0" aria-valuemax="100"></div>
</div>
Striped
Bring in .progress-bar-striped to any .progress-bar in order to apply a stripe via CSS gradient over the progress bar's background color tone.
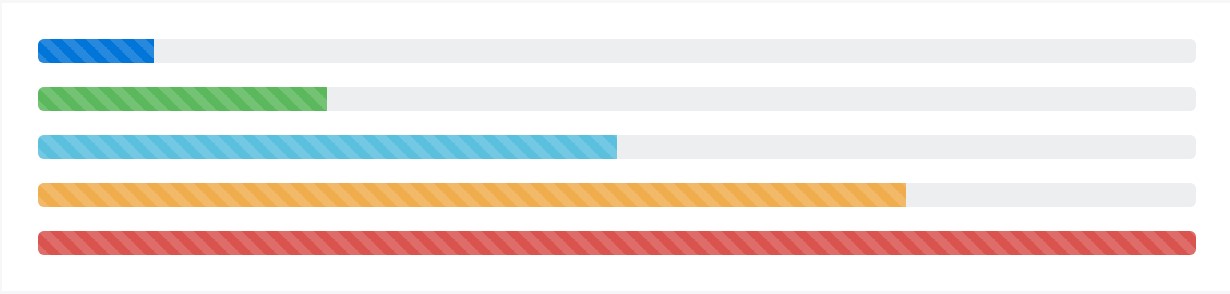
<div class="progress">
  <div class="progress-bar progress-bar-striped" role="progressbar" style="width: 10%" aria-valuenow="10" aria-valuemin="0" aria-valuemax="100"></div>
</div>
<div class="progress">
  <div class="progress-bar progress-bar-striped bg-success" role="progressbar" style="width: 25%" aria-valuenow="25" aria-valuemin="0" aria-valuemax="100"></div>
</div>
<div class="progress">
  <div class="progress-bar progress-bar-striped bg-info" role="progressbar" style="width: 50%" aria-valuenow="50" aria-valuemin="0" aria-valuemax="100"></div>
</div>
<div class="progress">
  <div class="progress-bar progress-bar-striped bg-warning" role="progressbar" style="width: 75%" aria-valuenow="75" aria-valuemin="0" aria-valuemax="100"></div>
</div>
<div class="progress">
  <div class="progress-bar progress-bar-striped bg-danger" role="progressbar" style="width: 100%" aria-valuenow="100" aria-valuemin="0" aria-valuemax="100"></div>
</div>
Animated stripes
The striped gradient can additionally be simply animated. Add in .progress-bar-animated to .progress-bar to animate the stripes right to left through CSS3 animations.
Animated progress bars really don't do work in Opera 12-- considering that they don't help CSS3 animations.

<div class="progress">
  <div class="progress-bar progress-bar-striped progress-bar-animated" role="progressbar" aria-valuenow="75" aria-valuemin="0" aria-valuemax="100" style="width: 75%"></div>
</div>
Conclusions
So generally that is simply the method you are able to display your growth in almost immediate and bright progress bar elements with Bootstrap 4-- right now all you need is some works in progress to make them present.
Examine a few online video short training regarding Bootstrap progress bar:
Related topics:
Bootstrap progress bar main information
Bootstrap progress bar article
How to animate a progress bar in Bootstrap 4?